Microsoft Business Intelligence (MSBI) Part -1 Introduction
What is Business Intelligence?
Most companies have plenty of data but not always the right data.
Data is not information. Data is often spread across heterogeneous systems and is not consistent across those systems.
Business Intelligence(BI) is the process of turning data into information so business can make better decisions faster. The process often involves consolidating data from different data sources and using tools to view the consolidated data. It helps as a decision support system and to easily access the data.
BI is an extension of Data Warehousing. Data warehousing is the process of taking data from one or more sources and consolidating it. Once the data is in a warehouse, a variety of tools can be used to view and analyze the data.
Data mining is a process of using statistical algorithms to
- Identify relationships between data elements
- Find trends in the data
- Forecast future performance
- And so forth
Users of a BI Solution
- Nearly anyone in an organization can benefit from a BI solution, including:
- Executive and business decision makers
- Information Workers
- Analysts
- Line Workers
- Even external vendors and customers
These users often need to interact with the data in different ways.
A single BI Solution can often deliver data to a wide variety of users throughout an organization.
BI is all about helping organization decision makers to take decisions using existing data.
Using BI we can create scorecards and dashboards.
Scorecards give an overview of the health of an organization in a single glance.
Dashboards contains one or more scorecards and other elements such as reports.
Information workers are non-management professionals. These workers typically need more detailed access than executives and business decision makers. Reports can often satisfy the needs of information workers.
Reports may be based on multidimensional cubes or a relational data warehouse.
Reports may be static or have some interactivity
- Reports may contain parameters the user can select,
- Reports may allow for limited drill up and drill down capabilities.
Analysts are a special group of information workers.
Analysts need powerful tools to explore the data in depth.
Analysts typically examine the data in detail and may employ data mining.
Analytic application provide rich access to the data. Analytic applications include:
-ProClarity
-Excel
-PerformancePoint Server
Line workers are those on the front lines, such as:
- Clerks in stores or in call centers
- Manufacturing employees on the shop floor
These workers may use BI data as part of their daily work without realizing it.
Custom Application Integration:
BI data can be leveraged in custom applications.
This extends the power of a BI solution to line-of-business applications.
Microsoft BI data is easily accessible to .NET developers for integration with web and windows applications.
External Customers and Vendors:
A BI solution may provide access to external users.
In nearly every case this access comes via Web interfaces.
Web interfaces to BI data can be provided by:
- PerformancePoint Server
- ProClarity Analytic Server
- Excel Services
- SQL Server Reporting Services
Most companies have plenty of data but not always the right data.
Data is not information. Data is often spread across heterogeneous systems and is not consistent across those systems.
Business Intelligence(BI) is the process of turning data into information so business can make better decisions faster. The process often involves consolidating data from different data sources and using tools to view the consolidated data. It helps as a decision support system and to easily access the data.
BI is an extension of Data Warehousing. Data warehousing is the process of taking data from one or more sources and consolidating it. Once the data is in a warehouse, a variety of tools can be used to view and analyze the data.
Data mining is a process of using statistical algorithms to
- Identify relationships between data elements
- Find trends in the data
- Forecast future performance
- And so forth
Users of a BI Solution
- Nearly anyone in an organization can benefit from a BI solution, including:
- Executive and business decision makers
- Information Workers
- Analysts
- Line Workers
- Even external vendors and customers
These users often need to interact with the data in different ways.
A single BI Solution can often deliver data to a wide variety of users throughout an organization.
BI is all about helping organization decision makers to take decisions using existing data.
Using BI we can create scorecards and dashboards.
Scorecards give an overview of the health of an organization in a single glance.
Dashboards contains one or more scorecards and other elements such as reports.
Information workers are non-management professionals. These workers typically need more detailed access than executives and business decision makers. Reports can often satisfy the needs of information workers.
Reports may be based on multidimensional cubes or a relational data warehouse.
Reports may be static or have some interactivity
- Reports may contain parameters the user can select,
- Reports may allow for limited drill up and drill down capabilities.
Analysts are a special group of information workers.
Analysts need powerful tools to explore the data in depth.
Analysts typically examine the data in detail and may employ data mining.
Analytic application provide rich access to the data. Analytic applications include:
-ProClarity
-Excel
-PerformancePoint Server
Line workers are those on the front lines, such as:
- Clerks in stores or in call centers
- Manufacturing employees on the shop floor
These workers may use BI data as part of their daily work without realizing it.
Custom Application Integration:
BI data can be leveraged in custom applications.
This extends the power of a BI solution to line-of-business applications.
Microsoft BI data is easily accessible to .NET developers for integration with web and windows applications.
External Customers and Vendors:
A BI solution may provide access to external users.
In nearly every case this access comes via Web interfaces.
Web interfaces to BI data can be provided by:
- PerformancePoint Server
- ProClarity Analytic Server
- Excel Services
- SQL Server Reporting Services
Microsoft Azure Part - 4 FTP deployment of Azure sites using Filezilla
In azure portal - Click on Web apps tab from left panel - Select the website for which you want to deploy files through FTP(File transfer protocol).


Under dashboard tab - Click on setup your deployment credentials link to create ftp credentials for the first time. From second time you have to click on reset your deployment credentials.

Credentials will be username and password that can used in FTP client to connect to azure server to upload files.
Now on the same page at the bottom right side you can find ftp host name and ftp username which are required to connect to server.

Download and install Filezilla (free ftp client software) to connect to azure server.
In filezilla enter
host name
username,
and password.
Click on quick connect to connect to remote server and the files in remote server will be displayed in the below right side panel.
You can directly drag and drop from local site (Your system) to remote site (Azure server location).
Place files in wwwroot folder in server(/site/wwwroot).
Make sure that the startup page configured is present in your site to open as start up page.
Deploy the files and refresh your azure site to see the updated changes.
This process works for deploying PHP, wordpress and other sites as well.
Tag :
Microsoft Azure
Microsoft Azure Part - 3 Portal Management Configure Setting of web app
In Microsoft Azure portal https://manage.windowsazure.com you have to login with valid credentials after creating free azure account using credit card details.
Using this portal you can manage cloud services.
On the left panel you can see all available services.


In general group under Configure tab you can see general settings that let you configure your web app's environment. These are the IIS settings which has default settings but can be customized based on requirements.
Managed Pipeline mode
Platform: 64 bit address is more faster, secure, 32 bit is default option.
You can specify a 64-bit system only in Basic or Standard mode.
Click here for more information about Platform
Web Sockets: It is a protocol that makes interaction between server and browser without full post back from server.
It provides ability to create chat applications and games.
This concept is supported in latest browser but should be available in server side as well.
Click here for more information about web sockets
Always on: After 20 seconds services are off to save resources. But this new always on feature pings server regularly and make it warm and on all the time for providing quick response.
Certificates: It allows you to add SSL certificates.
Domain names: It allows you to add one or more domain names which may contain primary and secondary domain names as well like www.ecartfood.in, ecartfood.in, ecartfood.azurewebsites.in.
SSL Bindings: Already added SSL certificates has to be bind to a specific ip address or domain name using this feature.
Application diagnostics:
If you on Application logging you can monitor health of application. Logging level can be error, warning, information and verbose.
We have other two options like logging in Table storage or blob storage to save data in that location.
Site diagnostics:
Every request can be logged using web server loggin. You can also set the amount of detail you want to record.
Failed request tracing to see the record of issues.
Click here for more info about failed request tracing
Remote debugging: To debug code in remote machine
Click here for more info about remote debugging
Monitoring:
To ping the azure site to make sure that it is running by configuring endpoints.
Developer analytics:
For monitoring performance of application using third party tools. You can get metrics and more.
App settings:
This is the private information which shouldn't be hard coded in the code. Service or code administrator can set up this using portal also. These are mainly Social logins, connections strings,..
Connection strings:
Database connection strings containing sql server database connection server, database information which can be added here to use it in the application.
Default documents:
To add start up pages for web application.
Handler mappings:
IIS settings used to bring own runtime to azure by writing some scripts.
click here for more info about handler mappings
Virtual applications and directories:
Used to map physical path to a virtual path.
If you a very long path which you want to map to easy path you can use this option.
\
Using this portal you can manage cloud services.
On the left panel you can see all available services.

Click on the web application name to view all settings related to selected web app.

In general group under Configure tab you can see general settings that let you configure your web app's environment. These are the IIS settings which has default settings but can be customized based on requirements.
Managed Pipeline mode
- Integrated mode allows IIS to process requests in the application pool by using the IIS 7 and later integrated pipeline. This allows ASP.NET modules to participate in IIS request processing regardless of the type of resource requested.
- Classic mode uses the IIS 6.0 processing pipeline for hosting ASP.NET applications. In this mode, requests are processed initially through IIS 7 and later modules, and ASP.NET requests are further processed by the aspnet_isapi.dll.
Platform: 64 bit address is more faster, secure, 32 bit is default option.
You can specify a 64-bit system only in Basic or Standard mode.
Click here for more information about Platform
Web Sockets: It is a protocol that makes interaction between server and browser without full post back from server.
It provides ability to create chat applications and games.
This concept is supported in latest browser but should be available in server side as well.
Click here for more information about web sockets
Always on: After 20 seconds services are off to save resources. But this new always on feature pings server regularly and make it warm and on all the time for providing quick response.
Certificates: It allows you to add SSL certificates.
Domain names: It allows you to add one or more domain names which may contain primary and secondary domain names as well like www.ecartfood.in, ecartfood.in, ecartfood.azurewebsites.in.
SSL Bindings: Already added SSL certificates has to be bind to a specific ip address or domain name using this feature.
Application diagnostics:
If you on Application logging you can monitor health of application. Logging level can be error, warning, information and verbose.
We have other two options like logging in Table storage or blob storage to save data in that location.
Site diagnostics:
Every request can be logged using web server loggin. You can also set the amount of detail you want to record.
Failed request tracing to see the record of issues.
Click here for more info about failed request tracing
Remote debugging: To debug code in remote machine
Click here for more info about remote debugging
Monitoring:
To ping the azure site to make sure that it is running by configuring endpoints.
Developer analytics:
For monitoring performance of application using third party tools. You can get metrics and more.
App settings:
This is the private information which shouldn't be hard coded in the code. Service or code administrator can set up this using portal also. These are mainly Social logins, connections strings,..
Connection strings:
Database connection strings containing sql server database connection server, database information which can be added here to use it in the application.
Default documents:
To add start up pages for web application.
Handler mappings:
IIS settings used to bring own runtime to azure by writing some scripts.
click here for more info about handler mappings
Virtual applications and directories:
Used to map physical path to a virtual path.
If you a very long path which you want to map to easy path you can use this option.
\
Tag :
Microsoft Azure
Microsoft Azure Part - 2 How Websites Works?
Web hosting plans:
One azure subscription can have one or more website plans.One azure subscription can have one or more resource groups.
A resource group can have virtual machines, websites,...
Azure websites deployed into the same subscription, resource group and geographic location can share a single web hosting plan.
Each Azure Website sharing a web hosting plan can leverage all the capabilities of that plan.
Each Azure Website sharing a web hosting plan can leverage all the capabilities of that plan.
In azure portal by selecting websites from left pane - Click on website - Under scale tab - you can select web hosting plan mode.

Link for : How Azure pricing works?
From the second time it has information in cache about where the application is located i.e., in which web worker.
Hot website: One website is hosted in a physical machine in one web worker. If one web worker goes down it you cannot get response for your application.
If your website is hosted in more than one physical machine(Web workers). Then if one web worker goes down the request is redirected to other web worker which will grab resources from other physical locations available.


Scaling: With shared plan your website is deployed to two different servers(Instances) and the requested are shared among the instances which is known as scaling.
Scaling can be done by Scaling Up or Scaling Out.
Scaling up: Increasing processing power or resources of an instance is known as scaling up.
Scaling out: Increasing number of instances or servers is known as Scaling out. This helps in sharing the request coming in for the application by different servers.
There are two types of instances:
1. Shared Instances
- Free plan
- Shared plan
2. Reserved Instances
- Basic Plan
- Standard Plan
In Reserved Instances(Basic and Standard)
In Reserved Instances IIS will be in Always on mode i.e., it is always in active state and waiting for giving immediate response for the request. By default, IIS will not be active for more than 20 minutes there is no request coming to IIS.
In shared plan you are scaling out to multiple dedicated compute instances in which other websites are not hosted other than your application.
SSL certificates, Web sockets and SLA 99.9% features are available.
In Standard plan
Scale out to up to 10 dedicated compute instances.
Bacups, Autoscale, Azure Scheduler, Staged Publishing is available.
Scaling up can be done by creating small, medium, large instances also by increasing, RAM and CPU Cores.


How website works?
When first time the application(Website) is request it doesn't have information about the location of the application. Then request is delegated to the web worker. Then web worker will grab information from all locations like hosting sites DB, storage controller and site's content DB and gives response back to the IIS Application Request Router and then web page is given back to the user.From the second time it has information in cache about where the application is located i.e., in which web worker.
Hot website: One website is hosted in a physical machine in one web worker. If one web worker goes down it you cannot get response for your application.
If your website is hosted in more than one physical machine(Web workers). Then if one web worker goes down the request is redirected to other web worker which will grab resources from other physical locations available.


Scaling can be done by Scaling Up or Scaling Out.
Scaling up: Increasing processing power or resources of an instance is known as scaling up.
Scaling out: Increasing number of instances or servers is known as Scaling out. This helps in sharing the request coming in for the application by different servers.
There are two types of instances:
1. Shared Instances
- Free plan
- Shared plan
2. Reserved Instances
- Basic Plan
- Standard Plan
In Reserved Instances(Basic and Standard)
In Reserved Instances IIS will be in Always on mode i.e., it is always in active state and waiting for giving immediate response for the request. By default, IIS will not be active for more than 20 minutes there is no request coming to IIS.
In shared plan you are scaling out to multiple dedicated compute instances in which other websites are not hosted other than your application.
SSL certificates, Web sockets and SLA 99.9% features are available.
In Standard plan
Scale out to up to 10 dedicated compute instances.
Bacups, Autoscale, Azure Scheduler, Staged Publishing is available.
Scaling up can be done by creating small, medium, large instances also by increasing, RAM and CPU Cores.


Tag :
Microsoft Azure
Microsoft Azure Part - 1 Website Creation and hosting/publishing using Visual Studio
You should have a Microsoft Azure account to work on Azure which is a Microsoft cloud platform. It helps you to host your applications, databases and lot more in cloud which can be managed easily using azure management portal.
Azure portal link
https://manage.windowsazure.com/
You can create a 30 day trial account by signing up using credit card details.
1 $ will be charged for account creation and you can use the cloud services upto $200 for free within 30 days.
If you want to use more data you have to accept pay as you use option. Amount will be charged from your credit card after you accept it.
Usage details will be available in the portal.

Open visual studio 2013 or later versions(I am using VS 2015 community for this example).
Create a new project - Web - ASP.NET Web application using .NET Framework 4.5.
Select Empty template - Select a check box host in cloud and select Web app from dropdown under Microsoft Azure block.
Now configure Microsoft Azure Web app
Enter app name and also service, plan names if they are not configured in portal and using Azure account for the first time.
Click on Ok and it will create a website in Azure. You can also see it in the azure portal by going through websites tab in azure portal.
Now add a web form in visual studio and design the page with some content like hello world.
Check the output in the local host in visual studio.
Hosting it to azure:
Right click on the project root folder and click on publish.
Give some options required to validate connection and selecting publish method as Web Deploy.
Click on Next to select release - Next
Have a preview of the files that you are publishing click on publish to publish it to azure cloud.
Now after successful publishing our website in azure will get launched automatically in the browser. and refresh the page to see the output of your site.
Snapshot of azure portal after publishing website to azure.

Configuring Startup page for azure site:
Open azure portal - Click on Web apps in left pane - Click on the web site name
Go to configure tab - Go to default documents section where you find existing default page names. You can also add new or remove existing default document names here.
Video tutorial link
Microsoft Virtual Academy Azure Website Link
Authentication:
Authentication is of different types:
1. Using login and password in website.
2. Using management certificates using private key and public key to authenticate services.
A single subscription can have 100 certificates only. So 100 apps can use authentication using certificates.
3. Three roles owner, contributor and viewer
How to get Azure certificate?
Login into Azure management portal and open the below link to download the certificate which you can use to authenticate with certificate. It is an xml file contains key to authenticate to azure from visual studio.
https://manage.windowsazure.com/publishsettings/index
Using Azure certificate in visual studio through import option?
Right click on Azure Root folder in Server explorer and click on manage and filter subscriptions.
Under certificates tab import option can be used to browse and select downloaded certificate from portal and click on import. You can see 1 certificate added under certificates tab.
Make sure that you have added your subscription details as well.
Reference link: Azure certificates
In your web project you can see .pubxml file in properties -> PublishProfiles folder which is used to store publish settings.
In the same folder you will also have your encrypted password saving file but it is only visible if you go to that folder location but you can't see it in solution explorer of visual studio for security reasons.
This password is used to authenticate while publishing files and project from different resources to Azure.
A publishsettings file is also known as an Account file.
Azure portal link
https://manage.windowsazure.com/
You can create a 30 day trial account by signing up using credit card details.
1 $ will be charged for account creation and you can use the cloud services upto $200 for free within 30 days.
If you want to use more data you have to accept pay as you use option. Amount will be charged from your credit card after you accept it.
Usage details will be available in the portal.

Open visual studio 2013 or later versions(I am using VS 2015 community for this example).
Create a new project - Web - ASP.NET Web application using .NET Framework 4.5.
Select Empty template - Select a check box host in cloud and select Web app from dropdown under Microsoft Azure block.
Now configure Microsoft Azure Web app
Enter app name and also service, plan names if they are not configured in portal and using Azure account for the first time.
Click on Ok and it will create a website in Azure. You can also see it in the azure portal by going through websites tab in azure portal.
Now add a web form in visual studio and design the page with some content like hello world.
Check the output in the local host in visual studio.
Hosting it to azure:
Right click on the project root folder and click on publish.
Give some options required to validate connection and selecting publish method as Web Deploy.
Click on Next to select release - Next
Have a preview of the files that you are publishing click on publish to publish it to azure cloud.
Now after successful publishing our website in azure will get launched automatically in the browser. and refresh the page to see the output of your site.
Snapshot of azure portal after publishing website to azure.

Configuring Startup page for azure site:
Open azure portal - Click on Web apps in left pane - Click on the web site name
Go to configure tab - Go to default documents section where you find existing default page names. You can also add new or remove existing default document names here.
Video tutorial link
Microsoft Virtual Academy Azure Website Link
Authentication:
Authentication is of different types:
1. Using login and password in website.
2. Using management certificates using private key and public key to authenticate services.
A single subscription can have 100 certificates only. So 100 apps can use authentication using certificates.
3. Three roles owner, contributor and viewer
How to get Azure certificate?
Login into Azure management portal and open the below link to download the certificate which you can use to authenticate with certificate. It is an xml file contains key to authenticate to azure from visual studio.
https://manage.windowsazure.com/publishsettings/index
Using Azure certificate in visual studio through import option?
Right click on Azure Root folder in Server explorer and click on manage and filter subscriptions.
Under certificates tab import option can be used to browse and select downloaded certificate from portal and click on import. You can see 1 certificate added under certificates tab.
Make sure that you have added your subscription details as well.
Reference link: Azure certificates
In your web project you can see .pubxml file in properties -> PublishProfiles folder which is used to store publish settings.
In the same folder you will also have your encrypted password saving file but it is only visible if you go to that folder location but you can't see it in solution explorer of visual studio for security reasons.
This password is used to authenticate while publishing files and project from different resources to Azure.
A publishsettings file is also known as an Account file.
Tag :
Microsoft Azure
LINQ TUTORIAL PART 5 - LINQ to ENTITIES
LINQ to Entities
Construct ObjectQuery instance out of ObjectContext.
Create a query in C#.NET
Conversion of Linq operators and expressions into command trees.
Executing query with exceptions
Returning all the results to client directly.
ObjectContext used by Linq queries to connect to database.
Step by step example for linq to entities in Console applications:
In this example data from SQL Server database table is displayed, inserted, updated and deleted from console application


Construct ObjectQuery instance out of ObjectContext.
Create a query in C#.NET
Conversion of Linq operators and expressions into command trees.
Executing query with exceptions
Returning all the results to client directly.
ObjectContext used by Linq queries to connect to database.
Step by step example for linq to entities in Console applications:
In this example data from SQL Server database table is displayed, inserted, updated and deleted from console application
- Create database table using below query and insert some data
create table tbl_student(sno int identity primary key, name varchar(20),course varchar(20))
insert into tbl_student values('sudhir','abcd') - Create a console application
Right click on project name in solution explorer and click on add item
Select ADO,NET ENTITY DATA MODEL.

- Click on Add
- Select generate from database and click on Next
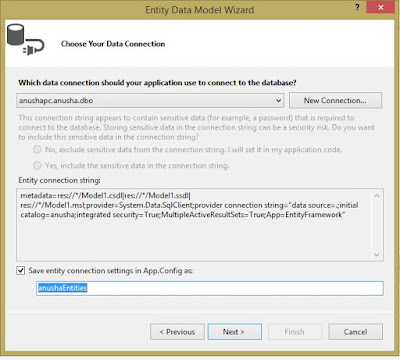
- Click on Add new connection to create a new connection the database server
- Enter server name, select authentication, select database in which you created the database
- Click on test connection to check the connection. If it is passed then click on OK.
- Select the save entity connection settings check box and click on NEXT.


- Select the table and remember the Model namespace name which we use in the code
- Click on Finish.
Example program in console application for CRUD operations with LINQ to Entities
using System;
using System.Collections.Generic;
using System.Linq;
using System.Text;
using System.Threading.Tasks;
namespace LinqApp
{
class Program
{
static void Main(string[] args)
{
using (anushaEntities context = new anushaEntities())
{
//Get the List of student details from Student Database table
var studentList = from s in context.tbl_student
select s;
//Display the List of student details from Student Database table
//Use this loop after every operation to see the updated data from the database
//studentList contains table data and row by row is retrieved to stud to display all details
foreach (var stud in studentList)
{//name and course from every row is displayed
Console.WriteLine("Student Name " + stud.name + ", Course " + stud.course);
}
//Add new student details
//Created new student details using an object
tbl_student student = new tbl_student() { name = "Raj", course = "PHP" };
//Adding details using student object to the table
context.tbl_student.Add(student);
//Saving data to database using db context
context.SaveChanges();
//Printing success message to user
Console.WriteLine("Student details is inserted in Database");
////Update existing Student details
//First row in student table matched with condition is returned
var studUpdate = context.tbl_student.FirstOrDefault(s => s.name == "sudhir");
//Course value in returned row is updated with new value
studUpdate.course = "Azure";
//Updated changes are saved to database
context.SaveChanges();
//Success message is displayed to user
Console.WriteLine("Student details updated in Database");
////Delete existing student details
////First row in student table matched with condition is returned
var studDelete = context.tbl_student.FirstOrDefault(s => s.name == "sudhir");
////Returned row is deleted using context table
context.tbl_student.Remove(studDelete);
//Changes are saved to database
context.SaveChanges();
//Success message is displayed to user
Console.WriteLine("Student details deleted in Database");
}
Console.WriteLine("\nPress any key to continue.");
Console.ReadKey();
}
}
}
Tag :
ADO.NET Entity Framework
,
LINQ
LINQ TUTORIAL PART 4 - LINQ to XML
LINQ to XML is used to query data from xml document using simple queries so that we can save data from xml in other formats.
Example program for LINQ to XML:
using System;
using System.Collections.Generic;
using System.Linq;
using System.Xml.Linq;
namespace LINQApp
{
class Program
{
static void Main(string[] args)
{
//xml data in saved in string
string myXML = @"<Students>
<StudentName>Amir</StudentName>
<StudentName>Salman</StudentName>
<StudentName>Sharukh</StudentName>
<StudentName>Hrithik</StudentName>
</Students>";
XDocument xdoc = new XDocument();
//Converting data in string to XDocument format.
xdoc = XDocument.Parse(myXML);
//Quering all elements under Students tag
var result = xdoc.Element("Students").Descendants();
//Printing Values inside all retreived nodes(Nodes inside Students node)
foreach (XElement item in result)
{
Console.WriteLine("Student Name - " + item.Value);
}
Console.ReadKey();
}
}
}
Example program to Add new xml tags in exiting xml document:
using System;
using System.Collections.Generic;
using System.Linq;
using System.Xml.Linq;
namespace LINQApp
{
class Program
{
static void Main(string[] args)
{
string myXML = @"<Courses>
<Course>PHP</Course>
<Course>JAVA</Course>
<Course>DOT NET</Course>
</Courses>";
XDocument xdoc = new XDocument();
xdoc = XDocument.Parse(myXML);
//Add new Element or appending new element in xml document at the ending
xdoc.Element("Courses").Add(new XElement("Course", "Phython"));
//Add new Element at First
xdoc.Element("Courses").AddFirst(new XElement("Course", "SQL Server"));
var result = xdoc.Element("Courses").Descendants();
foreach (XElement item in result)
{
Console.WriteLine("Course Name - " + item.Value);
}
Console.ReadKey();
}
}
}
Output:
SQL Server
PHP
JAVA
DOTNET
Phython
Example of LINQ to XML to remove or delete xml tag
using System;
using System.Collections.Generic;
using System.Linq;
using System.Xml.Linq;
namespace LINQApp
{
class Program
{
static void Main(string[] args)
{//Creating xml document text in string
string XML = @"<Courses>
<Course>DotNET</Course>
<Course>JAVA</Course>
<Course>PHP</Course>
<Course>SQL Server</Course>
</Courses>";
XDocument xdoc = new XDocument();
//Converting string type to XML Document format
xdoc = XDocument.Parse(XML);
//Querying to delete where course value matched with JAVA
xdoc.Descendants().Where(s => s.Value == "JAVA").Remove();
//Retreiving all courses from xml document
var items = xdoc.Element("Courses").Descendants();
//Printing all course names
foreach (string s in items)
{
Console.WriteLine("Course Name: " + s);
}
Console.ReadKey();
}
}
}
Example program for LINQ to XML:
using System;
using System.Collections.Generic;
using System.Linq;
using System.Xml.Linq;
namespace LINQApp
{
class Program
{
static void Main(string[] args)
{
//xml data in saved in string
string myXML = @"<Students>
<StudentName>Amir</StudentName>
<StudentName>Salman</StudentName>
<StudentName>Sharukh</StudentName>
<StudentName>Hrithik</StudentName>
</Students>";
XDocument xdoc = new XDocument();
//Converting data in string to XDocument format.
xdoc = XDocument.Parse(myXML);
//Quering all elements under Students tag
var result = xdoc.Element("Students").Descendants();
//Printing Values inside all retreived nodes(Nodes inside Students node)
foreach (XElement item in result)
{
Console.WriteLine("Student Name - " + item.Value);
}
Console.ReadKey();
}
}
}
Example program to Add new xml tags in exiting xml document:
using System;
using System.Collections.Generic;
using System.Linq;
using System.Xml.Linq;
namespace LINQApp
{
class Program
{
static void Main(string[] args)
{
string myXML = @"<Courses>
<Course>PHP</Course>
<Course>JAVA</Course>
<Course>DOT NET</Course>
</Courses>";
XDocument xdoc = new XDocument();
xdoc = XDocument.Parse(myXML);
//Add new Element or appending new element in xml document at the ending
xdoc.Element("Courses").Add(new XElement("Course", "Phython"));
//Add new Element at First
xdoc.Element("Courses").AddFirst(new XElement("Course", "SQL Server"));
var result = xdoc.Element("Courses").Descendants();
foreach (XElement item in result)
{
Console.WriteLine("Course Name - " + item.Value);
}
Console.ReadKey();
}
}
}
Output:
SQL Server
PHP
JAVA
DOTNET
Phython
Example of LINQ to XML to remove or delete xml tag
using System;
using System.Collections.Generic;
using System.Linq;
using System.Xml.Linq;
namespace LINQApp
{
class Program
{
static void Main(string[] args)
{//Creating xml document text in string
string XML = @"<Courses>
<Course>DotNET</Course>
<Course>JAVA</Course>
<Course>PHP</Course>
<Course>SQL Server</Course>
</Courses>";
XDocument xdoc = new XDocument();
//Converting string type to XML Document format
xdoc = XDocument.Parse(XML);
//Querying to delete where course value matched with JAVA
xdoc.Descendants().Where(s => s.Value == "JAVA").Remove();
//Retreiving all courses from xml document
var items = xdoc.Element("Courses").Descendants();
//Printing all course names
foreach (string s in items)
{
Console.WriteLine("Course Name: " + s);
}
Console.ReadKey();
}
}
}
Output
DotNET
PHP
SQL Server
PHP
SQL Server
Tag :
LINQ