- Back to Home »
- ASP.NET »
- MVC 4 Part-2 Creating first MVC4 application
Posted by :
Sudhir Chekuri
Saturday, 23 November 2013
Step by Step demo to create MVC 4 application
File - New Project - Select C# - Web - ASP.NET MVC 4 Web Application
Project types - Empty contains nothing recommended for experts.
Basic contains some important MVC elements to use.
Internet application contains lot of required elements as default.
Select Basic to follow this example.
Select Razor as view engine to write razor code in the project.
Solution Explorer with project files structure
Steps to add a controller
Right click on the controller folder and click on add - controller.
Enter controller name as FirstController.
Actually here First is the name of the controller.
Select empty API controller as template and click on Add.
Index.cshtml is the default view which is displayed when project is executed.
It is located in Home folder inside Views folder in solution explorer.
URL routing
The url routing is defined in RouteConfig.cs file which is present inside App_Start folder.
In that which url is mapped to which controller is defined.
url: "{controller}/{action}/{id}",
defaults: new { controller = "Home", action = "Index", id = UrlParameter.Optional }
This default router says that if there in no controller mentioned in the url then Home will be the default Controller and if there is no action mentioned in the url then Index will be the action performed.
File - New Project - Select C# - Web - ASP.NET MVC 4 Web Application
Project types - Empty contains nothing recommended for experts.
Basic contains some important MVC elements to use.
Internet application contains lot of required elements as default.
Select Basic to follow this example.
Select Razor as view engine to write razor code in the project.
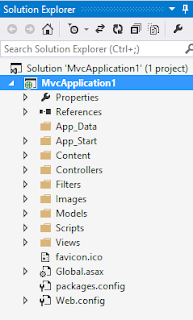
Solution Explorer with project files structure
Controllers to hold controllers in the project. Models folder to add models of the project and views folder to add views for the project. Scripts folder is where javascript and jquery files are added.
Steps to add a controller
Right click on the controller folder and click on add - controller.
Enter controller name as FirstController.
Actually here First is the name of the controller.
Select empty API controller as template and click on Add.
Index.cshtml is the default view which is displayed when project is executed.
It is located in Home folder inside Views folder in solution explorer.
URL routing
The url routing is defined in RouteConfig.cs file which is present inside App_Start folder.
In that which url is mapped to which controller is defined.
url: "{controller}/{action}/{id}",
defaults: new { controller = "Home", action = "Index", id = UrlParameter.Optional }
This default router says that if there in no controller mentioned in the url then Home will be the default Controller and if there is no action mentioned in the url then Index will be the action performed.


